I recently had my barn freezer go out. While it’s always inconvenient, I had just bought half of a cow, which is quite costly. A good majority of the meat had gone bad, and we didn’t know it for a day or so. To ensure this didn’t happen again, I tried to see if I could use my nerd skills to figure out a way to prevent this in the future.
I started, by looking at existing products. I found some probes that would make an audible beep if out of a temperature range. This didn’t work great for me, since the beeps would be emitting from my barn, which is far away from my house. Other products existed which utilized Bluetooth on your phone, however, since my phone is not in the barn regularly, this also fails. I did find some that would work over WiFi, but they were $150+. This made me wonder if I could DIY for cheaper.
My requirements were as follows:
- Standalone WiFi connection (no phone needed, or proximity to the sensor to hear audible tones)
- Cheaper than $149
- Ability to send alerts to mobile devices if freezer got warm
- No monthly fees
- Inexpensive to run (low power consumption)
- Parts readily available
- Could continue running if power was lost
I started my research, and found a DS18B20 probe sensor that a friend had recommended from some of his IoT work at a local university. They were super cheap, and already waterproof. It communicates over a 1-Wire (OneWire or Dallas are common alternative names) protocol, and has a tolerance of +/- 0.5C.
As of late, I’ve been using HomeAssistant for a lot of my automation tasks, and I found that for a main controller board, I could use an ESP8266 with ESPHome. There are a large number of ESP8266 varieties to pick from. However, since a power outage was my concern, I decided to look for one that had battery capabilities (and ideally a charging circuit). I ended up landing on the Adafruit Huzzah ESP8266. This board is fairly inexpensive, although a bit pricier than a lot of other ESP8266 boards I’ve bought.
I wired it up on a breadboard, using some pull-down resistors, which are required for the DS18B20. Some of the ones I found on ebay and Amazon have them built-in, so check and see. Mine did not, so you will see them on the circuit design.

After wiring it up and flashing it with my ESPHome firmware, I was able to see the data coming into HomeAssistant. It was brilliant!

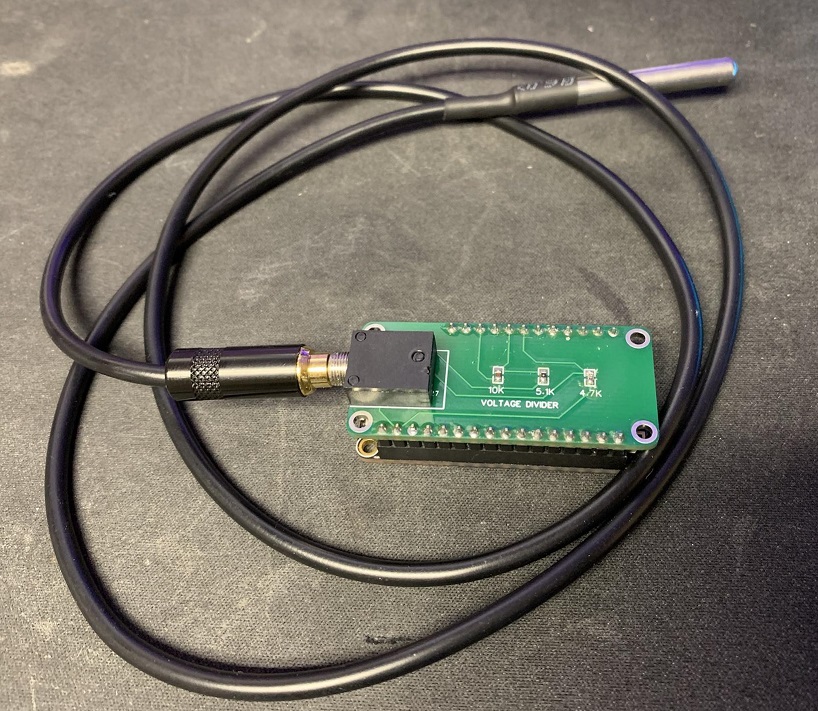
This was fine and good, until I wanted to actually install it on my freezer. It was on a breadboard, and there were wires hanging everywhere. it was a mess, and not super reliable. I figured it was a good enough time as any to learn some basic circuit board design and print my own PCB.
I used EasyEDA as a beginner. Other tools that were recommended were Eagle and KiCad, but I wanted to start easy. I created a schematic, and ordered the PCBs through JLCPCB, which they’re partnered with. A couple weeks later, they came in the mail.

After soldering the components onto the board, and getting it setup with pin headers, I plugged it into the Adafruit Huzza ESP8266, wrote the firmware, and it worked too! However, this time, it had no wires hanging off, and didn’t require a breadboard.

In the near future, I plan on making a 3d printed enclosure/case for it, so that I don’t have to worry about shorting any pins on the metal of my freezer, but for now, some foam adhesive has been holding it with no problem. The Lipo battery that I stole from another project would be better protected in a case than sitting on top of the freezer next to the board.
This was a super fun project, and I ended up making it for significantly cheaper than $149. The bill of materials for the electronic components was $4.34 plus shipping for a single board (although I bought 5x). The Adafruit Huzzah ESP8266 was around $20. I got 5 custom PCBs for $20 shipped. All in all, it was under $50 and super configurable. I can use HomeAssistant to send SMS alerts when the temperature gets low, or if the board loses power, due to the voltage monitor I added. This has already saved us from losing an entire freezer again since implementing it.
If this sounds useful to you, I put all the project files, Gerber files, and an example HomeAssistant config file on my Github here: https://github.com/mandreko/adafruit-feather-huzzah-8266-ds18b20-voltage-binary-sensor.
If you end up building this project, let me know! I’d love to see it.


